Kore Tech Tip
How to Import Data From Excel
Tip
#1017
Importing Data into DataFlo from Excel using wIntegrate
Do you want to simplify and automate data import and export to/from your DataFlo database and integrate with SQL Server or other applications?
Check out Kourier Integrator with SQL Accelerator - Kore's ETL and EAI solution for DataFlo
Looking for more DataFlo solutions? - Check out the DataFlo home page
Check out Kourier Integrator with SQL Accelerator - Kore's ETL and EAI solution for DataFlo
Looking for more DataFlo solutions? - Check out the DataFlo home page
wIntegrate's Export feature enables moving data into DataFlo files using the native "F" dictionary descriptors defined in the DataFlo application files.
Many of you in the DataFlo technical community are by now experts at using the wIntegrate Import function. This would be a natural by-product of supporting your user community's requirements for ever more output data from the ERP system in support of one initiative or another. There may be instances when you might find it handy to use the Export function of wIntegrate as well. This feature enables moving data into DataFlo files using the native "F" dictionary descriptors defined in the DataFlo application files. When would this be useful? How about when your company acquires the product line of another company and you need to upload a few hundred or a few thousand parts and all they give you to work with is an EXCEL spreadsheet? Have no fear the solution is near! Export it from Windows EXCEL to DataFlo.
We recommend uploading data into DataFlo by using the EXPORT feature in another user account, separate from your main production account. You would be best off using a user account in which you are able to clear the PARTS file completely so that you know you are beginning with a clean slate. This also helps to insure that you do not overwrite existing data. Before you use the Export feature of wIntegrate to upload this data, remove the first two rows of the Excel spreadsheet as shown in Figure 1 so that you are left with only the data rows. In our Figure 1 example, row one identifies the F dictionary descriptors corresponding to each column of data. You would use these F descriptors to upload the data with the Export feature of wIntegrate. Row two describes the data in each column.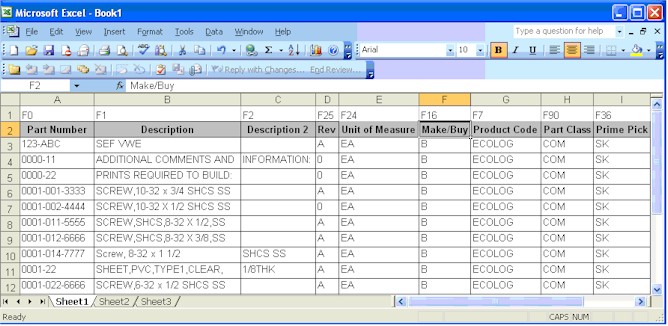
Figure 1 - Excel Rows of Sample Data
Note, there are some caveats to this approach for uploading data:
To access the Export feature, click on the Run menu option on the top-level menu choice of wIntegrate as shown in Figure 2 below.
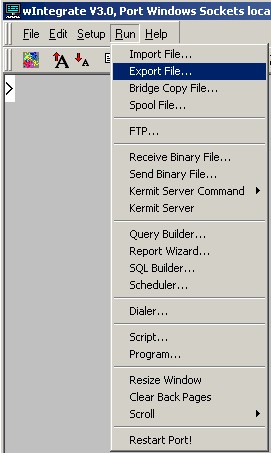
Figure 2 - wIntegrate Run menu
Then fill in the prompts for the Export File feature as shown below in Figure 3, this will upload the EXCEL spreadsheet sample data shown above in Figure 1.
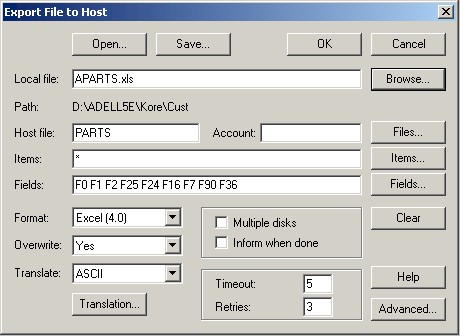
Figure 3 - wIntegrate Export File dialog
After you have finished using the EXPORT command to upload the data to the PARTS file, you can run any baseline PARTS reports to examine the data. You could also go to TCL and list the fields you upload by turning on wide mode. To do this you would type TCL at any MENU Control Prompt. Once at TCL level you would type the command WON to set the screen to wide mode (132 characters). Typing the command WOFF would toggle you back to normal (80 character) mode. While in the wide mode you could list the fields in the PARTS records you uploaded by typing the following command at the TCL prompt:
or key at the end of the command line.
Once you have validated the data to your satisfaction, you will want to copy the data from the PARTS file in the account you are in to the live, product user account. How do you do this? Easy! You create a pointer in the VOC (short for vocabulary, this is the master dictionary of the account you are in). If you are using UniVerse, you would use the SET.FILE command. If you are using UniData, you use the SETFILE command. At the TCL level, typing the HELP and the correct version of the pointer creation command for your system will provide you with guidance on how to use this command. For example: key.
Now that you have created the Q-pointer to the target PARTS file, you should check to see if you have any records with the same PARTS id as the target PARTS file. The NSELECT command is very useful in helping to determine this. The NSELECT command is used with a select list of IDs to determine if any of the IDs exist in a specified file. Note the following commands:
Okay, you have uploaded your new PARTS data using the wIntegrate EXPORT feature, you have checked the data, verified your record counts, created a Q-pointer to your target PARTS file and checked to make sure there are no duplicates. How do you get your new PARTS records over to the target file? The COPY command is used to accomplish this as follows:
We hope you find this tech tip as useful as we do. When you can use scripts instead of writing code, it typically saves time. As always, if you have any question on how to do any of this safely, please call us.
We recommend uploading data into DataFlo by using the EXPORT feature in another user account, separate from your main production account. You would be best off using a user account in which you are able to clear the PARTS file completely so that you know you are beginning with a clean slate. This also helps to insure that you do not overwrite existing data. Before you use the Export feature of wIntegrate to upload this data, remove the first two rows of the Excel spreadsheet as shown in Figure 1 so that you are left with only the data rows. In our Figure 1 example, row one identifies the F dictionary descriptors corresponding to each column of data. You would use these F descriptors to upload the data with the Export feature of wIntegrate. Row two describes the data in each column.
Figure 1 - Excel Rows of Sample Data
- The first requirement is that the EXCEL sheet must be in EXCEL 4.0 data format. To save the data in this format, click on the save option of EXCEL and modify the "Save as type" in the format "Microsoft 4.0 Worksheet (*.xls)".
- Perhaps the most important caveat is that there is NO application level data validation that occurs as part of this processing. This means that you must cleanse the data somewhat BEFORE you upload. If your data contains duplicates, your source data record counts may not match your destination record counts the last duplicate record will overwrite any previous record(s).
- Export does not work with multi-value data record types. For example, you will not be able to upload data directly into a Bill of Material (BOM) record that has multi-value datasets. However, this last issue can be overcome relatively easily by loading the BOM line data into an intermediate data file and using a BASIC program to build the BOM record from the BOM line items. (Call us if you need help with this one, we do this kind of stuff all the time!)
To access the Export feature, click on the Run menu option on the top-level menu choice of wIntegrate as shown in Figure 2 below.
Figure 2 - wIntegrate Run menu
Then fill in the prompts for the Export File feature as shown below in Figure 3, this will upload the EXCEL spreadsheet sample data shown above in Figure 1.
Figure 3 - wIntegrate Export File dialog
> SORT PARTS F0 F1 F2 F25 F24 F16 F7 F90 F36 ID-SUPPThis more than likely will list the data in what we refer to as vertical mode for each PARTS record. If you use the following command instead, the data will list vertically because the column headings are shorter for the synonym dictionary descriptors:
> SORT PARTS PART_NO DESC DESCRIPTION2 REV UM_ISSUE M_B PROD_CODE PRT_CLASS F36 ID-SUPPNote that the above command will run after you press the
Once you have validated the data to your satisfaction, you will want to copy the data from the PARTS file in the account you are in to the live, product user account. How do you do this? Easy! You create a pointer in the VOC (short for vocabulary, this is the master dictionary of the account you are in). If you are using UniVerse, you would use the SET.FILE command. If you are using UniData, you use the SETFILE command. At the TCL level, typing the HELP and the correct version of the pointer creation command for your system will provide you with guidance on how to use this command. For example:
> HELP SET.FILEor
> HELP SETFILEIn the UniVerse RDBMS, the command execution might look like this:
> SET.FILE

Q.name: LPARTS

Account: DATAFLO

File:    PARTS

Q-Pointer written to VOC file.
Make sure you use a "Q name" that does not already exist in your VOC. How do you make sure of this? By checking the VOC using the EDIT command as follows:
> ED VOC LPARTS

  New Record

   ----:EX
If the VOC entry does NOT exist, the system will tell you it is a new record. Exit the record by typing EX following the
Now that you have created the Q-pointer to the target PARTS file, you should check to see if you have any records with the same PARTS id as the target PARTS file. The NSELECT command is very useful in helping to determine this. The NSELECT command is used with a select list of IDs to determine if any of the IDs exist in a specified file. Note the following commands:
> SELECT PARTS

  192 record(s) select to select list #0

> NSELECT LPARTS

  192 record(s) select to select list #0
The results of this NSELECT tell us that there are no duplicate IDs in the new PARTS records you have created because the record counts are the same between your original select list and the NSELECT.
Okay, you have uploaded your new PARTS data using the wIntegrate EXPORT feature, you have checked the data, verified your record counts, created a Q-pointer to your target PARTS file and checked to make sure there are no duplicates. How do you get your new PARTS records over to the target file? The COPY command is used to accomplish this as follows:
> SELECT PARTS

  192 record(s) select to select list #0

> COPY PARTS

  : (LPARTS
Note that the left parenthesis on the last line above is VERY important, it tells the COPY command that you are copying data to a NEW file.
We hope you find this tech tip as useful as we do. When you can use scripts instead of writing code, it typically saves time. As always, if you have any question on how to do any of this safely, please call us.
We hope you find this tech tip as useful. As always, if you have any question on how to do any of this, please call us.
wIntegrate is a product, copyright, and trademark of Rocket Softwre, Inc.
DataFlo is a product, copyright, and trademark of Epicor Corporation


Our technical tips are provided to help you find new or easier ways to solve some of your technical challenges or to show you a new technique. We hope you find them useful. Please contact us if you would like to share one of your Tech Tips or need help solving a technical challenge. We would be happy to help you.
View Tech Tip Archive